In November last year, I have explained, how you can use different Git settings for personal and company projects. In one of the snippets, I have used an SSH key to sign commits. But as in the past, commits were usually signed using GPG keys, I want to explain what you have to do, to use an SSH key to sign your commits.
Step 0: Create an SSH key pair
You probably already have a key pair. How else would you clone repositories from Git hosting platforms? But in case you don’t have an SSH key pair, run this command:
ssh-keygen -t ed25519 -C [email protected]
I would recommend using the ed25519 cipher algorithm. You can also set the comment, otherwise it would be user@machine from the machine you are creating the key on. I would also recommend setting a passphrase, but it’s not necessary for using the key to sign commits.
Step 1: Update your Git configuration
Now that we have an SSH key, we can add it to our configuration. We can do that with the following command:
git config --global user.signingkey ~/.ssh/id_ed25519
As Git is still using GPG keys by default to sign commit, you have to tell it to use SSH keys instead. This can be done adding this settings:
git config --global gpg.format ssh
If you have never signed commits before and want to sign all commits by default, run this command:
git config --global commit.gpgsign true
Don’t get confused, that the setting is called gpgsign, it will still sign your commits using SSH.
Step 2: Define the “allowed signers” (optional)
When you commit something and then show the log including signatures, you will see the following error:
git log --show-signature
error: gpg.ssh.allowedSignersFile needs to be configured and exist for ssh signature verification
commit eccdf56431b052772b09027c5cea585b8e7eee32 (HEAD -> master)
No signature
Author: Jo Doe <[email protected]>
Date:   Sun Jan 29 19:07:52 2023 +0000
This is because Git does not know if any of the public keys is valid. We can fix this by adding another setting to our git configuration:
git config --global gpg.ssh.allowedSignersFile ~/.git_allowed_signers
And now we also have to create this file, otherwise we would get a different error. You add one public key per line, with the email address of the key in the first “column” and the content of the public key after this. The file could look like this:
# ~/.git_allowed_signers
[email protected] ssh-ed25519 AAAAC3NzaC1lZDI1NTE5AAAAIJ818qdUM98GriqpTKhqMmwYAgeK3iiCg07Qgya5NwN/ [email protected]
When you show the Git log again, you should see a valid signature:
git log --show-signature
commit eccdf56431b052772b09027c5cea585b8e7eee32 (HEAD -> master)
Good "git" signature for [email protected] with ED25519 key SHA256:/qGkPHs1/58u7jZgX95+hr5PNFs7gXswbkcRdfZuMWk
Author: Jo Doe <[email protected]>
Date:   Sun Jan 29 19:07:52 2023 +0000
After these steps, your Git configuration should (at least) look like this:
[user]
	email = [email protected]
	name = Jo Doe
	signingkey = ~/.ssh/id_ed25519
[commit]
	gpgsign = true
[gpg]
	format = ssh
[gpg "ssh"]
	allowedSignersFile = ~/.git_allowed_signers
Step 3: Add key to Git hosting platforms
Many of you will probably use GitHub, GitLab or other Git hosting platforms. At least the two mentioned platforms also support SSH keys for signing in their UI.
Add the key to GitHub
Navigate to “Settings | SSH and GPG keys“. Then click the “New SSH key” Button. In the “Key type”, choose “Signing Key”. Add your public key and give it a title:
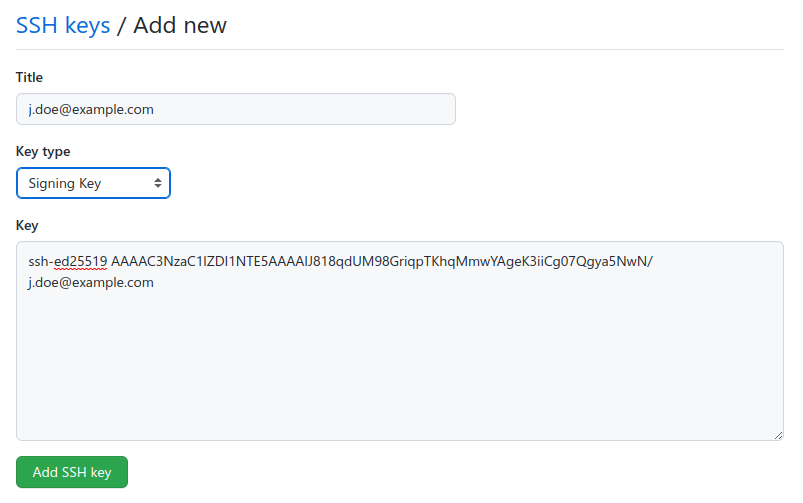
You can use the same key, as you might have already used for the “Authentication Key”.
Add the key to GitLab
Navigate to “Preferences (User Settings) | SSH Keys“. Here, you can insert the key into the form and either choose “Authentication & Signing” or just “Signing” in the “Usage type” dropdown:

By default, the keys at GitLab have an “Expiration date”, but you can also leave this empty. You can always extend the validation by deleting the key and adding it again. Since SSH keys do not expire (GPG keys usually do), you might want to give the default date a try.
Step 4: Verify that commits are signed
We have already checked on the terminal in the Git log, that our signature is correct. On GitHub and GitLab, you can see the signed signature check on most views with a commit hash. In the commits list of GitHub, it looks like this:
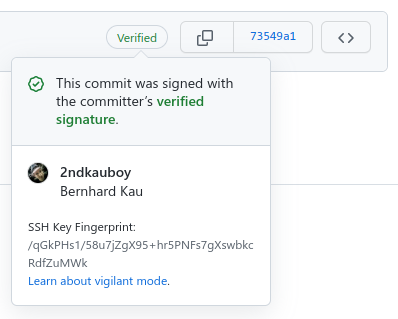
In the commits lists of GitLab, it looks like this:
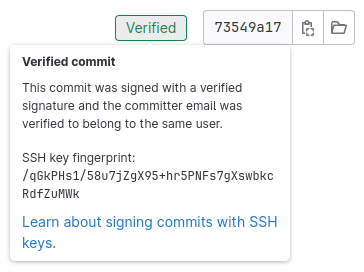
The SSH key fingerprint is the same, as we have seen in the Git log on the terminal already: /qGkPHs1/58u7jZgX95+hr5PNFs7gXswbkcRdfZuMWk.
Conclusion
For a long time, GPG keys were the ones to use when signing off commits. But since GPG can be quite complex to set up and manage, not too many people used commit signing. If you don’t use GPG already – like for signing and/or encrypting emails – you might just use SSH keys instead to sign your commits. But you can also use both for different projects. In this case, just read my blog post about different Git configurations again, and don’t put the settings in the global, but in the included configuration files.
git config –global user.signkey ~/.ssh/id_ed25519
should be
git config –global user.signingkey ~/.ssh/id_ed25519
You are right, thanks for pointing it out. I have updated it in the blog post.