One of the questions I hear a lot in different settings is this: “Which plugin do you use on every site?”. I usually don’t have an answer for that, since in my opinion, there is no “mandatory plugin”. But one plugin I do use almost always, at least while developing a site, is the Query Monitor plugin. It helps me a lot in finding issues with the site. I even have it active on some production sites.
Since I work on some projects hosted on WordPress VIP, I was asked to take some VIP trainings. One of these is around all the ways in which you can debug a website. And sure enough, Query Monitor is also available on WordPress VIP sites.
Extending the Query Monitor plugin
As I’m a frequent user of Query Monitor, I am very familiar with most of its panels. Some of them I use all the time, others rather rarely. But I was not aware that you can “easily” add your own panels with your own debugging data to Query Monitor. Some plugin use this to add information, others have additional “debugging plugins” to add the panels. On the Query Monitor website, you can find a list of those “Add-On plugins”.
The VIP training had an example on how to add some random data to a new panel, and this was so fascinating to me, that I wanted to try it out. I also found a nice use-case for my blog. Since I am using MultilingualPress to translate my blog posts, I thought it would be nice to have a list of translated content on a page or post. So that’s what I am going to demonstrate here.
Collecting the data
The Query Monitor plugin is written using OOP (object-oriented programming) and the first thing we have to implement is a class extending the QM_DataCollector class from Query Monitor, to collect the data we want to display.
The data is stored in a “storage”. We don’t have to implement a custom one, but I wanted to implement a full solution, so I created this implementation of a QM_Data class first:
class QM_Data_MLP_Translations extends QM_Data {
	/**
	 * @var Translation[]
	 */
	public $translations;
}
The MultilingualPress API is using a custom class Translation and we would use an array of these objects in our data class. Now we can implement our QM_DataCollector implementation:
class QM_Collector_MLP_Translations extends QM_DataCollector {

	public $id = 'mlp_translations';

	private $current_locale;

	public function __construct() {
		parent::__construct();
		$this->current_locale = get_locale();
	}

	public function get_storage(): QM_Data {
		return new QM_Data_MLP_Translations();
	}

	public function process(): void {
		$args = TranslationSearchArgs::forContext(
			new WordPressContext()
		)->forSiteId( get_current_blog_id() )->includeBase();

		$translations = resolve( Translations::class )->searchTranslations( $args );

		$this->data->translations = [];
		foreach ( $translations as $translation ) {
			if ( $translation->language()->locale() !== $this->current_locale
				 && $translation->remoteContentId() !== 0 ) {
				$this->data->translations[] = $translation;
			}
		}
	}
}
Every QM_DataCollector needs an $id property, and we use a vendor prefixed mlp_translations value here. In the constructor, we also save the current locale, as for some reasons, it was later changed to the locale from the user profile. In the get_storage() function, we are using the QM_Data object we implemented first.
The most important part is the process() function. This is where we collect the data and add it to our storage. You don’t have to understand the first few lines, as these are the specific functions from MultilingualPress to get a list of all translations to a post or page. The collection of your data might be different, but you will probably end up having a loop to add the data you want to use into $this->data. In my case, I filter out the current translation and also only add those with a remoteContentId, which would give me only “singular content”.
Initializing the Collector
The last step is to initialize the “collector” object in a filter. This is done with the following filter:
function register_qm_collector_mlp_translations( array $collectors ) {
	$collectors['mlp_translations'] = new QM_Collector_MLP_Translations();

	return $collectors;
}

add_filter( 'qm/collectors', 'register_qm_collector_mlp_translations', 10 );
Nothing really fancy here. Now that we have our “collector” with the data we want to display, let’s take a look at how we can do that.
Adding our data to Query Monitor
Query Monitor has several panels, and you can either add your own panel, or you add data to an existing one as a “child panel”. I went with the second approach, as it seemed to me more logical to add my data to the “Languages” panel. This is the complete code (with comments removed):
class QM_Output_MLP_Translationsextends QM_Output_Html {

	protected $collector;

	public function __construct( QM_Collector $collector ) {
		parent::__construct( $collector );
		add_filter( 'qm/output/panel_menus', array( $this, 'panel_menu' ), 20 );
	}

	public function name() {
		return __( 'Translations', 'multilingualpress' );
	}

	public function output() {
		$data = $this->collector->get_data();

		if ( empty( $data->translations ) ) {
			$this->before_non_tabular_output();

			$notice = __(
				'No translations for this content.',
				'multilingualpress-qm'
			);
			echo $this->build_notice( $notice );

			$this->after_non_tabular_output();

			return;
		}

		$id = sprintf( 'qm-%s', $this->collector->id );

		$this->before_tabular_output( $id );

		$this->output_translation_table( $data->translations );

		$this->after_tabular_output();
	}

	protected function output_translation_table( array $translations ): void {
		echo '<thead>';
		echo '<tr>';
		printf( '<th>%s</th>', esc_html__( 'Locale', 'multilingualpress-qm' ) );
		printf( '<th>%s</th>', esc_html__( 'Title', 'multilingualpress-qm' ) );
		printf( '<th>%s</th>', esc_html__( 'Post ID', 'multilingualpress-qm' ) );
		printf( '<th>%s</th>', esc_html__( 'Site ID', 'multilingualpress-qm' ) );
		echo '</tr>';
		echo '<tbody>';

		foreach ( $translations as $translation ) {
			echo '<tr>';
			printf(
				'<th scope="row"><code>%s</code></th>',
				esc_html( $translation->language()->locale() )
			);
			printf(
				'<td class="qm-ltr">%s</td>',
				$this->build_link(
					$translation->remoteUrl(),
					$translation->remoteTitle()
				)
			);
			printf(
				'<td class="qm-num">%s</td>',
				esc_html( $translation->remoteContentId() )
			);
			printf(
				'<td class="qm-num">%s</td>',
				esc_html( $translation->remoteSiteId() )
			);
			echo '</tr>';
		}

		echo '</tbody>';
	}

	public function panel_menu( array $menu ) {
		if ( ! isset( $menu['qm-languages'] ) ) {
			return $menu;
		}

		$data = $this->collector->get_data();

		$menu['qm-languages']['children'][] = $this->menu(
			[
				'title' => sprintf(
					esc_html__(
						'Content Translations (%s)',
						'multilingualpress-qm'
					),
					number_format_i18n( count( $data->translations ) )
				)
			]
		);

		return $menu;
	}
}
Let me explain some of the important functions. In the constructor, we are using a filter to call our panel_menu() function, that adds the panel. Here you can see that I add the data to the children of qm-languages. I also get the collected data here to be able to add the number of translations to the panel title.
In the output() function, we generate the output. We first check if data is available. If not, we just output a notice. You may have recognized all these $this->before_*_output() and $this->after_*_out() functions. They are inherited from the parent class QM_Output_Html and saves us from writing some HTML markup ourselves.
The most important output is happening in the output_translation_table() function. This is a helper function that I have added. You might not need to have such a function, and you can also rename it so it best fits your use-case. I just named it similar to other functions in Query Monitor itself.
After generating the <thead> with some table column names, we print out the data for the translations. We are using some methods of the Translation objects from MultilingualPress to get the site ID, post ID, post title and permalink for the translated content.
Initializing the output class
Just as with the collector class, we have to initialize our HTML output class. We use another filter here:
function register_qm_output_mlp_translations( array $output ) {
	$collector = QM_Collectors::get( 'mlp_translations' );
	if ( $collector ) {
		$output['mlp_translations'] = new QM_Output_MLP_Translations( $collector );
	}

	return $output;
}

add_filter( 'qm/outputter/html', 'register_qm_output_mlp_translations', 50 );
With this last class implemented, we have all the parts we would need for our custom Query Monitor panel.
Bringing it all together
Now, one last step is missing. We still need to load all files. We could do it as simple as this:
if ( defined( 'QM_DISABLED' ) && constant( 'QM_DISABLED' ) ) {
	return;
}

add_action(
	'plugins_loaded',
	static function () {
		require_once __DIR__ . '/data/languages_mlp_translations.php';
		require_once __DIR__ . '/collectors/languages_mlp_translations.php';
		require_once __DIR__ . '/output/html/languages_mlp_translations.php';
	}
);
To avoid loading the classes if Query Monitor was disabled, we first check the QM_DISABLED constant. We then require or files with the three classes, which contain the filters to initialize them. In the implementation, I wanted to stick as closely to the Query Monitor code base, as possible. I would usually not have filters to initialize classes in the same file as the classes themselves.
The result
After doing all that, you probably all want to see the result of our work, right? Then let’s install that plugin real quick on my blog and show you the output for my last blog post:
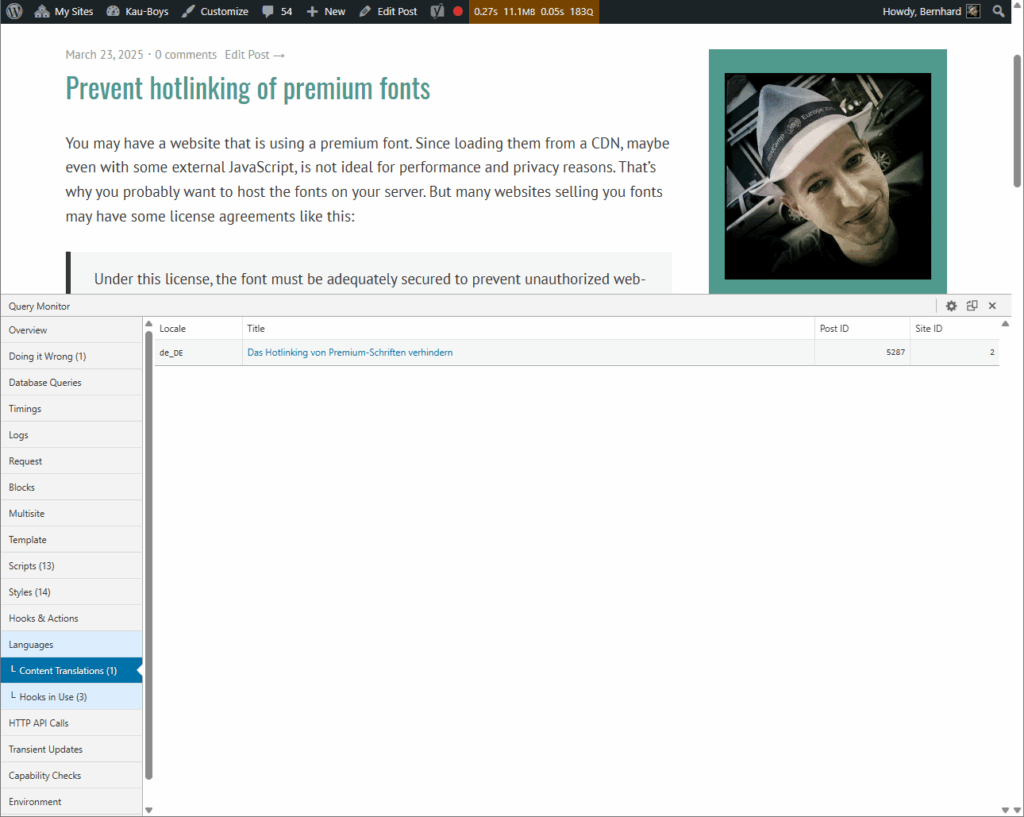
Pretty cool, right? Since my blog has only two languages, and it only shows one translation, this might not be super useful. But we could think about other information to show in this panel. Maybe the translation of all taxonomies used in the blog post. Or some important settings from MultilingualPress.
Conclusion
Adding a custom panel to Query Monitor can help you debug important information more easily. You might have a very different use-case for a custom Query Monitor panel. Or maybe you have even used it yourself in the past. Then please share a link to your solution, if it’s public.
If you have MultilingualPress running on your website as well, or just want to see the full code of this example, you can find it on Github where you can also download it as a plugin ZIP and test it.
[…] Kau published a tutorial on how to add a custom panel to Query Monitor. Query Monitor should be in every WordPress developer toolbox, and how to customize it is a very […]