If you only ever deal with English strings in your code, you can stop reading now. Unless you are curious and want to learn something new, then please stay. 😉
In languages like German, we have characters that don’t exist in the English alphabet. Some look similar to other characters, but some are extra. And in German we only have 4 of them, other languages have many more.
How strings are usually sorted
When you have an array of strings, there are different ways in how they are sorted. Let’s look at some examples:
console.log(['c', 'b', 'a', 'B', 'A', 'C'].sort())
// (6) ['A', 'B', 'C', 'a', 'b', 'c']
If you ever wrote some code and sorted it with a simple sorting function, you might be aware that many of them use the order of the characters in the ASCII table. That’s why we see the capital letters first, followed by the lower-case letters.
That might be just what we expect and want for English. But let’s throw in some German Umlaut into the array:
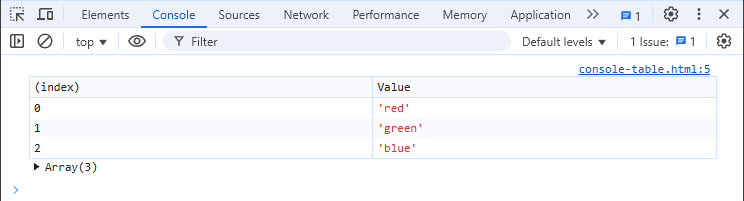
console.log(['ä', 'b', 'a', 'B', 'Ä', 'A'].sort())
// (6) ['A', 'B', 'a', 'b', 'Ä', 'ä']
Even if you don’t speak German and don’t know about the order of letters, this doesn’t look correct, right? The capital “Ä” comes after all other lower-case letters. Since the Umlauts are not part of the ASCII table (like most letters not include in “Basic Latin”), JavaScript is using their UTF-16 code unit values so sort them. These also represent each character with a number. The letter “Ä” for example has the numeric value 228, while “z” has 122, and that’s why it is ordered like above.
Using the Intl.Collator object for natural sorting
The solution for this is really very easy. The sort() function for an array can take a callback function as a parameter. This function get passed two values of the array. It should return a negative number, if the first value is smaller than the second one, return a positive number, if the opposite is true, or return 0, if both have the same value.
But we don’t have to write such a callback function for every language ourselves. Instead, we can use the Intl.Collator object. For our German umlaut example, the code would look like this:
console.log(['ä', 'b', 'a', 'B', 'Ä', 'A'].sort(new Intl.Collator('de').compare));
// (6) ['a', 'A', 'ä', 'Ä', 'b', 'B']
Not only do we now have our umlaut next to the similarly looking letters, we also get each lower-case letter followed by its capital letters. This is also what you would expect from a “dictionary sorting”.
Using the compare function directly
As mentioned earlier, the sort() function expects a callback that returns a negative, or positive number, or a 0. And this is exactly what the function does. We can explicitly call that function (and not only reference its name) and pass in two letters to compare:
new Intl.Collator('de').compare('ä', 'a')
// 1
new Intl.Collator('de').compare('a', 'ä')
// -1
new Intl.Collator('de').compare('a', 'a')
// 0
To demonstrate, that this function is not simply using a static list of numbers for each character, but really sorts by a specific language, here is a good example for that:
new Intl.Collator('de').compare('ä', 'z')
// -1
new Intl.Collator('sv').compare('ä', 'z')
// 1
The Swedish language, which I’m currently trying to learn, also has the “ä” letter. But it is sorted differently than a German umlaut, and you would find words starting with almost at the end of a Swedish dictionary (only followed by words starting with “ö”).
Using advanced options
There are some options you can also pass as an object to the sort() function, like in this example, when you want to have capital letters first:
console.log(
	['ä', 'b', 'a', 'B', 'Ä', 'A'].sort(
		new Intl.Collator(
			'de',
			{
				caseFirst: 'upper'
			}
		).compare
	)
);
// (6) ['A', 'a', 'Ä', 'ä', 'B', 'b']
You can find some more options on the documentation page or a full list in the ECMA specification. There are even some wild “languages” like “de-u-co-phonebk“, to order an array like it would appear in a German phone book – in case you know what I am talking about. 😁
Bonus: Sorting number string
I don’t want to write about all options, but one might be really helpful in your code. If you even sorted an array with numbers as string, you know that alphanumeric sorting does not work:
console.log(['1', '2', '11', '101', '3'].sort());
// (5) ['1', '101', '11', '2', '3']
But with the option numeric, you get what you want (the first “language” parameter might not be important here):
console.log(
	['1', '2', '11', '101', '3'].sort(
		new Intl.Collator(
			'en',
			{
				numeric: true
			}
		).compare
	)
);
// (5) ['1', '2', '3', '11', '101']
Just what we wanted to have. 😊
Conclusion
Sorting strings by their natural order in a specific language can really make a big difference on how usable your code is (or if it would even break things, if done incorrectly). With the Intl.Collator object, this is made rather easy in JavaScript. Other programming languages don’t provide such a powerful tool for you.