In the first debugging blog post, we’ve learned about the console.log() method and how it works to debug scalar types or arrays. But there is a nicer way to log arrays or objects in the browser.
The console.table() function
As mentioned in the first blog post, the console object has some more useful functions, and today we want to take a look at the table() function.
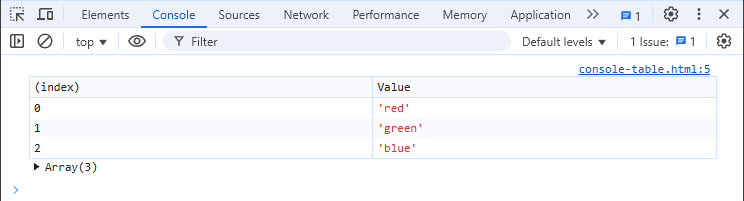
This is the most basic example. We just use a one-dimensional (numerical) array. This is the result in the browser console:
As you can see here, you get a table with two columns. The first one is the numerical “(index)” for the array, and the second one has the “Value” for each entry of the array. You will still always have the variable below the table, just as with console.log() and you can “expand” it here, to investigate it further.
Multidimensional arrays
The function can not only be used with simple one dimensional array, but you can also use it for multidimensional ones:
Now we have an array of (numerical) arrays and this is how it looks like in the console:
(index)
0
1
0
'Leia'
'Organa'
1
'Luke'
'Skywalker'
2
'Han'
'Solo'
We now have three columns. Since the “inner arrays” are numerical as well, we have column name “0” and “1” for them.
Logging objects
The function cannot only be used for arrays, but also for objects. The output depends on the structure of the objects.
Simple objects
Let’s create an object for one of the previous example:
function Person(firstName, lastName) {
	this.firstName = firstName;
	this.lastName = lastName;
}

const luke = new Person("Luke", "Skywalker");

console.table(luke);
And this is how that object would be logged into the browser console:
(index)
Value
firstName
'Luke'
lastName
'Skywalker'
Logging arrays of objects
How about logging an array with multiple objects of the same type? Again, an example like before:
const leia = new Person("Leia", "Organa");
const luke = new Person("Luke", "Skywalker");
const han = new Person("Han", "Solo");

console.table([leia, luke, han]);
This is the resulting table for this array of objects:
(index)
firstName
lastName
0
'Leia'
'Organa'
1
'Luke'
'Skywalker'
2
'Han'
'Solo'
As many of you might have expected, the column names are now the property names of the objects.
Logging multidimensional objects
The previous example was using a numerical array. But how about an object of objects? Here is an example:
const family = {};

family.mother = new Person("Padmé", "Amidala");
family.father = new Person("Anakin", "Skywalker");
family.daughter = new Person("Leia", "Organa");
family.son = new Person("Luke", "Skywalker");

console.table(family);
And the result of this will look like this:
(index)
firstName
lastName
mother
'Padmé'
'Amidala'
father
'Anakin'
'Skywalker'
daughter
'Leia'
'Organa'
son
'Luke'
'Skywalker'
That looks nice, right? Except for “(index)”, we have some good columns names and our index values also are not numerical anymore.
Logging only specific columns
The console.table() function has a second parameter columns, which is an array as well. It expects an array with the names of the columns/indices. So for our previous code, we could do this:
console.table(family, ["firstName"]);
And sure enough, this would be the logged results:
(index)
firstName
mother
'Padmé'
father
'Anakin'
daughter
'Leia'
son
'Luke'
Pretty neat, isn’t it? This can be really useful when debugging some larger objects with multiple properties.
Conclusion
Even though you can use the generic console.log() function to debug and log arrays and objects, seeing them in a logged table, can make reading them a lot easier. You also don’t have to “expand” the tables.
In the first advent calendar blog post with the topic HTML, I want to introduce an HTML element, some of you might not know. It’s not really its own element, but the <input> element of type color. With this element, you can add a very simple color picker to your web application.
Adding a color picker to your site
Inserting the color picker is straightforward. It’s an <input> element, and you can add a value attribute, if you want:
Yes, you always want to have a <label> with any form input field. If you don’t set a value, it would use #000000 as the default. You can also only set a hexadecimal RGB value, without an alpha value (transparency) so nothing like #00000066.
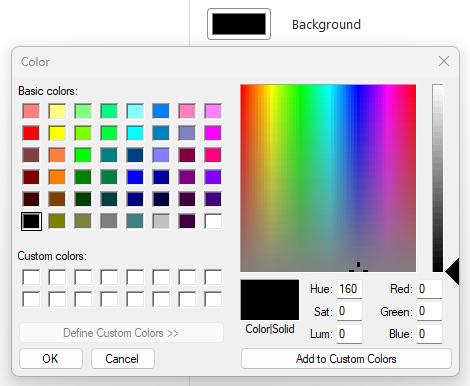
The color picker in different browsers
As with many other input-types, the color picker has a very different UI, depending on the operating system you are on and the browser you are using. There are some examples:
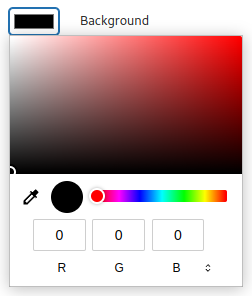
Chrome (Linux)
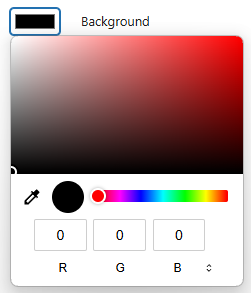
Chrome (Windows)
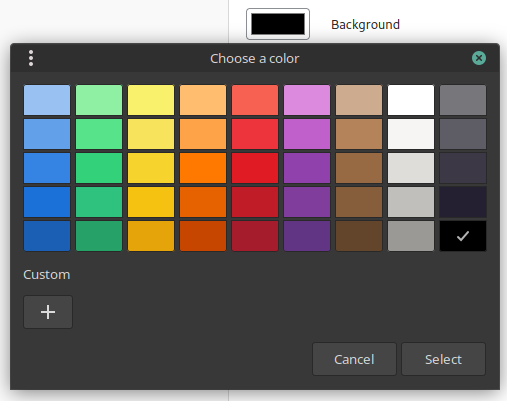
Firefox (Linux)
Firefox (Windows)
Chrome brings its own color picker, and it looks similar in Linux and Windows. Firefox on the other hand would use the native color picker from your OS.
Advanced usage with a color list
A bit hidden in the documentation of the element, you can see that the element can use a list attribute. That attribute alone would probably worth its own blog post. When you use that attribute, you can reference a <datalist> with some values. This is how it would be used:
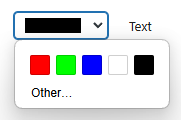
For the <option> values, you can also only use hexadecimal RGB values. This is how the color picker with the list looks like in Chrome:
Color list in Chrome (Windows)
If you have more than 5 values, it will show them in up to three rows with 5 colors each If you have even more values, it will show a scrollbar. In Firefox on Windows however, it would use the same color picker as before, and list the options below the “Custom colors” in the modal.
Bonus: Using WordPress color picker components
If you are developing a WordPress project, you can use the color picker components that are available in the WordPress components library.
The ColorPicker component
In @wordpress/components you will find the ColorPicker component, that would render the color picker:
import { useState } from 'react';
import { ColorPicker } from '@wordpress/components';

function MyColorPicker() {
    const [color, setColor] = useState();
    return (
        <ColorPicker
            color={color}
            onChange={setColor}
            enableAlpha
            defaultValue="#000"
        />
    );
}
When you use the components it would render “inline”, so not open on a click on a button:
If you want to have a button to open the color picker, you would have to implement that yourself. If you add the enableAlpha attribute, you can also use an RGB value with alpha (e.g. #00000066) in the input, or you switch from “Hex” to “RGB” or “HSL”, where you would have an alpha channel range setting.
The PanelColorSettings
There is currently no documentation for the PanelColorSettings component, but this is how you would use it:
In the colorSettings object, you can set multiple colors. In this example, we have one for a text and background color. This is how it would render:
As you can see here, the PanelColorSettings will not show a generic color picker, like the ColorPicker would do. Instead, it will present you with the color presets from the theme and from Core, depending on how these color settings are defined in the theme.json file.
Conclusion
Implementing a color picker was never easier, than with the native HTML input type. No more need to add a heavy jQuery/JavaScript library. Unless you want to use a color picker inside a WordPress project and also use the color palette from the theme. Then you can use the components from the block editor. They also have the benefit, that they render in the same way in any browser and any OS.
If you need a quick color picker for some random use case, you could also just google for “color picker”. 😉
You all know these websites with a sticky header, right? They have a horizontal navigation at the top, often with the site logo on the left – which is also often way too big, so not too many navigation items fit beside them. And then you scroll down these pages with this large header … and the header does not scroll off the page. Many people want that for their own website, but many people using this page don’t like it as much. I’m one of them.
Issues with sticky headers
There are multiple issues with such a sticky header. While there are valid reasons to have them, most of the time they are used for the wrong reasons – like website owners always want to see their logos or important navigation items. In my opinion: if people need to use your main navigation to find things, you are doing content wrong on your site. But what are the actual issues?
Issue 1: Elements appear behind or before the sticky header
Sure, when your website is designed with a sticky header, it probably pushed the content down. But since the sticky header needs to above the content when scrolling down, it might also cover some content that you can’t interact with anymore, like a popup that has the close button in the top right and that is now behind the header. And since often with popups, you can’t scroll the page while they are open, you can’t hit that closing button.
But you could also have issues with content that appears before the header, when you scroll down the page. That happens quite often with embedded elements, like a video, PDF or map embed.
Issue 2: Anchor links don’t work anymore
When you use an anchor link to navigate to parts of your site – which is really popular on “one pager websites”. Such an anchor element scrolls the website down (or up) so that the element is at the top of the page. And then it is behind your header.
Issue 3: Too little vertical space
When those headers are really high, you end up having not too much vertical space left on the page to view the content.
Let’s take an 11″ laptop with 720px height. Not as uncommon as you might think. Then we calculate the available vertical height:
Total: 720px
Windows taskbar: 66px
Chrome tabbar: 40px
Chrome address bar: 48px
Chrome bookmark bar: 34px
That leaves us with just 532px remaining vertical space. And now reduce this by another 60px only – that is about the current height of the header on my blog, which is really not high. This leaves you with only 472px of available space. And have we talked about those sticky cookie banners at the bottom already? That’s about the space that many of us have in landscape mode on our phones, and who really enjoys browsing a website in landscape mode?
Solutions
There are multiple solutions for the issues mentioned. Here are some that might work in your cases.
Issue 1
If a single (type of) embedded element is overlapping your header, you have to find a good z-index value for this element and overwrite it. Or you increase the z-index value of your header. But this can the lead to the issue with elements behind your header. You probably end up trying around with many manual z-index changes for multiple elements and still you find some elements that don’t appear as you want them to.
Issue 2
Most websites use some CSS like this to make a header sticky and move the content down:
Something like this would work for my header. It’s also what WordPress does, when it shows the “adminbar”. But it’s not the best solution to create a sticky header.
There is a relatively new value sticky for the position CSS property, and this is how the CSS code for a sticky header would look like with this new value:
.fixed-header {
    position: sticky;
    top: 0;
}
The great thing about it: the header does not need to be the first/top element on the page. You could have a logo, followed by the sticky header, and once that header reached the top of your browser viewport when scrolling down, it “sticks” to the top. In the past, this was only possible by toggling the position to fixed with JavaScript, and adding the margin-top at the same time. But now, modern browsers can do this kind of effect automatically.
No matter how we make our header sticky, we still have the issue with anchor links not working. The margin of 60px will not push any element down by that value, but only the beginning of the body.
To solve this, you could use an additional CSS property, to add an offset for the scrolling to the anchor like this:
html {
    scroll-padding-top: 60px;
}
This additional scroll-padding-top should get a value of at least the height of the header. And here you see another issue with this solution: if the header height changes, e.g. when the items don’t fit into one line anymore and break into two lines, then those static values don’t work anymore. You could now add some JavaScript to dynamically update these two values, but that’s not a great solution.
Issue 3
My favorite solution for this issue: just don’t use a sticky header. It also solves all the other issues. No, seriously. Does your header really need to be sticky? Does it make your website more usable? Can people read your content better or even find their way around? Please think twice before making a header sticky, and not just “because you like it that way”.
So in case you really need to make it sticky, there are some ways to make you website more usable:
Reduce the height of the header, once your site scrolls down – this is what many themes do, and they often also shrink the logo
Hide the sticky header after some scrolling, and show it again, once you scroll up – many apps do that for sticky header and footer bars
Make the header “not sticky”, if you detect a too low viewport height or if a device is in portrait mode
Conclusion
Some people love sticky headers, other hate them. You have to decide for yourself, if you want to have them. But please do one thing: don’t only test your website on your large desktop/laptop screen. Grab your smartphone and browse your website in landscape mode. Do you still think a sticky header is a good idea? Then use the techniques mentioned above to solve the usual issues with them.
No, I’m not going to start a video channel on this topic. But I want to show you some things about numbers, you might not have known before. The answer, however, as we all know, is 42.
Types of numbers
Let start with the very basics. You probably all know that in JavaScript, just like in many other programming languages, there are decimal number and floating-point numbers. But internally, they are all of the type Number. They are 64-bit, which should usually be enough for most code. But if you need really large numbers, you can also use BigInt to store them.
Some lesser known number types
Now that we know, that all (small) numbers are of type Number, we only know parts of the truth. We can have more than just two types. Here are the two typical ones, and some more, you might not have heard of or used in JavaScript:
42 // decimal
42.0 // float
042 // octal => 34 decimal - as digits after leading zero(s) are <= 8
099 // not octal, decimal 99, as digits after leading zero(s) are > 8
0o42 // explicit octal number - either lower- or uppercase latin "o"
0x42 // hexadecimal => 66 decimal - either lower- or uppercase latin "x"
0b101010 // binary 42, nice sequence ;) - either lower- or uppercase lat. "b"
0.042e3 // exponential number 42 - either lower- or uppercase latin "e"
42n // BigInt 42 - decimal followed by latin lower- "n" even for small number
Comparing numbers
As we have discussed earlier, except for BigInt, all numbers are the same type. Therefore, comparing the following numbers, these are the results:
That last one might be (a bit) unexpected. So when comparing a BigInt to any other number, you cannot use the “strict equality operator”, since the numbers are of a different type.
If you want to find out, if a number is an integer, you can use a function from the Number object:
As you can see, this function will return true, if the number is an integer, or a floating-point number with a zero fraction – or a really small fraction. Unfortunately, there are no similar functions to check for other number types.
Now some fun part
Do you need some very long numbers in your code? Then you probably end up with something really hard to read. But there is a neat little trick to make them more readable:
// That's a huge number!
let rubiksCubeConfigurations = 43252003274489856000;
// As a string, it's easier to read, but this is bad code!
let sameNumberAsString = parseInt("43252003274489856000");
// How about this?
let easierToRead = 43_252_003_274_489_856_000;
That’s more readable, right? The funny thing is, that you can use an underscore at any place, just not at the beginning or end of the number, not after a leading zero, and not two underscores in a row. But many of us will probably use them like shown above.
Bonus: Formatting numbers
Now that we have seen how to make numbers more readable in code, here is a tip to make them easier to read for people from different countries. In the US, you would write a number like this: “123,456.789”. But in Germany, you would write “123.456,789”. If we look at the Number object again, we will find the toLocaleString() function, and this is how you can use it:
Would you have known, how numbers are formatted in different languages? And in some languages, JavaScript will even output them with non latin letters. The same function can also be used to format currencies:
const costs = 123.4567;
// German with EUR
console.log(
    costs.toLocaleString("de-DE", { style: "currency", currency: "EUR" }),
); // 123,46 €
Conclusion
There are many really useful trick then dealing with numbers in JavaScript. I hope there was something for you, that will help you in a future project. I can also recommend to look at documentation of the other functions and features of the Number object.
It’s that time of the year again. Some of you just celebrated Thanksgiving, while the rest of the world only “celebrated” Black Friday. But I’m speaking about the 24 days before Christmas. Starting in 2015, I’ve set myself the goal to write one blog post per day. I managed to do that in 2015 and 2016 in German. In 2017, I did it in English as well in, but after only 10 day, I had to stop. Since then, I haven’t tried it again.
Restart of the advent calendar
This year, I will try to do it again. In the past editions, I hadn’t really planned all topic, if any. But this year, I was prepared a week early and already collected 24 potential topics to write about. I will focus on frontend topics and debugging. Every day, I will write about one of these four topics:
Debugging
JavaScript
CSS
HTML
The topics will be alternating, so you will get a debugging topic today, and then again in 4 days. The debugging topic came to mind, since we had some team learning session on Xdebug and looked at debugging in the browser as a follow-up. In my 6 blog posts on this topic, I will focus on the debugging in the browser.
Logging in the browser
The topic of debugging is very brought, and modern browsers offer numerous ways to debug things. So, let’s get started with something basic: logging things in JavaScript.
When you write some code in JavaScript, you might want to debug the code and see the value of certain things in the flow of a piece of code. In order to do this, you can use the console.log() function:
console.log(some_variable);
You can add this line to a JavaScript file in your (external) JavaScript code you use in your project, but you can also use this in the browser console directly. All modern browsers do have such a JavaScript console. In Chrome, you can open them with “CTRL + SHIFT + J” (Windows and Linux).
Logging some values
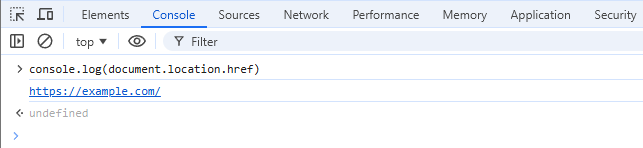
After opening the “Console” tab in the DevTools, you can enter any JavaScript code in the “prompt” at the end of the console. Let’s debug something here:
In this very simple example, we are debugging the value of the current URL of the site. The first line after our executed code is the output of the console.log() function. The second line with the undefined value is the response of the function itself.
If you are using the browser console, you don’t even need to use the console.log() function. You could directly type the JavaScript code into the prompt and hit enter. The console.log() function is usually used in some (external) script on your site:
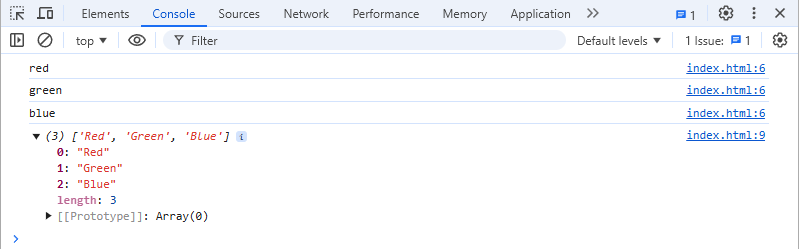
Let’s take this sample code. We have an array with colors and want to capitalize the values. We use the map() function on the array. Inside the function, we log the current item and after we have run it, we log the resulting capitalizedColors variable. The logging in the browser looks like this:
Since the array has three items, we see three lines with the value. At the end of each logged value, we see a reference index.html:6, which indicated the filename and line in this file the logging was done. We also see the logged array, which I already expanded by clicking on the small arrow. Chrome will even show us the length of the array and the “[[Prototype]]” for the array. If we expand this, we can see all properties and functions of the array. Here we would also find the map() function we just used.
Conclusion
That should be enough for today. Many of you will probably already know about this function. But did you know that there are more debugging functions available? We will take a closer look at some of them in the following blog posts in December.
I mainly use the Chrome DevTools, but you can also use the Firefox DevTools similarly. If you use Safari, Edge, Brave, or any other popular browser, just search for some resources on how to get started with those tools. So give it a try and debug some of your own JavaScript code.
Since I have stopped my current project with the new theme, I am now allowing myself to blog about other topics again. This week, I want to write about an important global HTML attribute: the lang attribute.
Maybe some of you have never (actively) used this attribute, but it’s quite important. Not only does it tell a search engine, what language the content on your website is written it, it also tells an assistive technology, like a screen reader, which voice to use when reading the text. It can even be set inline for a single word or parts of a text.
The main lang attribute however is set on the <html> tag. In WordPress, this is handled by the language_attributes() function, you would usually find in a header.php file in a classic theme. In a block theme, this is handled automatically in Core.
Reasons to overwrite the lang attribute
You would usually not want to change the value of the lang attribute, since WordPress will use the correct one, based on the language setting of your website. But there are cases in which you might want to change it.
Multilingual websites
WordPress can only have one frontend language, unless you install a multilingual plugin. I use MultilingualPress, which is based on multisite. In a WordPress multisite, you can set language per sub-site. This will automatically use the correct lang attribute in each site.
If your website does not use a multilingual plugin, but you have one page with a different language, you could overwrite the lang attribute with some code.
Loading of external code
Another use-case is when you use plugins, that would use the lang attribute to load some external data. I came across a cookie banner plugin this week, which would load the text for the banner from an external resource. It would use the exact value of the lang attribute, but it expects a value like en, so only with two characters. WordPress however is using a value like en-US, which would not work for this cookie banner. So we need to strip the second part of the value.
CSS using the attribute
A good example for a use-case in CSS is the quotes property. Different languages are using different quotation marks. When you want to use the proper quotation marks in a <q> HTML tag, you usually don’t have to do anything, since the browser will handle that for you, as the value is set to quotes: auto. But if you want to overwrite this, you could do the following:
q {
	quotes: "«" "»" "‹" "›";
}
This would always use quotes that are used in French and other languages, even if your lang attribute is set to en.
Some CSS libraries to use the lang attribute to change styles, but they might be doing it like this:
[lang="en"] q {
	/* Some styles */
}
This would not work, if the value is en-US for the lang attribute. There is the CSS :lang() pseudo-class that would work here:
:lang(en) {
	/* Some styles */
}
If you use en here, it would also work for en-US, en-GB, etc. But if you use en-US, it would not work for only en as well.
As the CSS from such a framework might be static, overwriting it might be a bit too complicated, so you might also want to change the value of the global lang attribute of the <html> tag.
How to change the value?
Let’s say, we want to change the value to a static other value for a specific page, you could do something like this:
This would overwrite the lang attribute of any page/post with “english” in the permalink to lang="en-US" for the <html> tag.
As you can see from the function, the filter would not only return the value, but also the attribute name. If you look at the full code of the get_language_attributes function, you can see that the function may return other attributes like dir as well:
function get_language_attributes( $doctype = 'html' ) {
	$attributes = array();

	if ( function_exists( 'is_rtl' ) && is_rtl() ) {
		$attributes[] = 'dir="rtl"';
	}

	$lang = get_bloginfo( 'language' );
	if ( $lang ) {
		if ( 'text/html' === get_option( 'html_type' ) || 'html' === $doctype ) {
			$attributes[] = 'lang="' . esc_attr( $lang ) . '"';
		}

		if ( 'text/html' !== get_option( 'html_type' ) || 'xhtml' === $doctype ) {
			$attributes[] = 'xml:lang="' . esc_attr( $lang ) . '"';
		}
	}

	$output = implode( ' ', $attributes );

	/**
	 * Filters the language attributes for display in the 'html' tag.
	 *
	 * @since 2.5.0
	 * @since 4.3.0 Added the `$doctype` parameter.
	 *
	 * @param string $output A space-separated list of language attributes.
	 * @param string $doctype The type of HTML document (xhtml|html).
	 */
	return apply_filters( 'language_attributes', $output, $doctype );
}
And plugins could also hook into this filter, so overwriting the $output with something static might not work. Unfortunately, there is no filter to change the $lang value only, and hooking into get_bloginfo(), to overwrite the language might break some other places, where this code is used. If you want to strip the second part of the value, you could use some regular expression like this:
If you need something even more complex, it’s probably best to just overwrite the whole function.
Conclusion
The lang attribute is a very important attribute every website should always set. But the value might not always be, what you need it to be. In those cases, you have a filter you can use to overwrite its value, but always make sure not to return something invalid.
My last blog post was back in July. I was not able to keep my usual rate of a new blog post every two weeks. This had many different reasons, some personal and some regarding people I care about. But one other reason was the slow pace on getting my new theme ready enough. And today I have to say: stop!
I used the demo content I usually use to design a theme and tried to replicate every little element “as pixel perfect as possible”. But since I’m now at ~900 lines of custom CSS code, and this would prevent people from overwriting styles in the Site Editor, this approach is not going to be a good one.
How to continue with this project?
As my main goals were to create a theme that is usable by as many users of the original Waipoua theme as possible, with as few “migration steps” as possible, I have to realize that it’s simple not feasible. I always knew that I would also need to offer a “companion plugin” as well, preserving all the shortcodes Waipoua was offering. But is that really worth it? How many users are there still who use Waipoua and who would be brave enough to migrate?
Option 1: Offering two different versions of my theme
My first thought, even some time ago, was to offer two variants of my theme. One that would try to be almost “pixel perfect” not breaking the styles of elements on existing sites. And one that would leverage the Site Editor to its fullest, by only adding styles through the Site Editor using the theme.json file.
In this approach, the first variant would load this ~900 lines of CSS file, the second one would only load one, that is necessary to style the header with the search. Or it would not try to replicate the search exactly how it is, and instead just offers a different search in the header.
Option 2: Taking this as a learning opportunity and move on
This project was really fun! But it was also very frustrating at times. One main thing I learned from it: writing a great theme is not easy! And my respect for the work of Ellen and Manuel grew with every hour I’ve tried to replicate their work.
Going forward
I still plan to create a new theme that would look similar enough to Waipoua, so people would recognize my page, and maybe not even realize it is a different theme. If you don’t compare the new and old version side by side, and just look and the colors, fonts and structure, you will probably just think there were some minor changes in the current theme.
I really don’t like the idea to add any custom CSS to my very first theme, that cannot be overwritten in the Site Editor by any user. And I would also like to not force users to use a companion plugin to make it work with their current content. I am one of these users myself, since I have used some shortcode in old blog posts, as there was no Block Editor around that would allow you to create “buttons” or columns in the text.
Help me with your feedback!
I often ask in my blog posts for comments, and most of the time I don’t get any. But this time I would really appreciate your feedback. Even more if you use Waipoua on one of your site. What would you like me to do? Create a theme with two variants (Option 1)? Or just try to create a real Block Theme that would not try to “support legacy content” (Option 2)?
When I’ve started this project, I had the goal to only use the Site Editor to rebuild the theme. I wanted to see how far I can come without using custom CSS. My final opponent was the header. Just using the options from the Site Editor and Core blocks, it was simply impossible to get the same overall look. Especially the Search block is too limited in its options.
Adding a CSS file
Just getting the search input with a custom background color (transparent) and styling the search icon was not possible. Trying to set the styles and effect for the input focus and styling the placeholder text, I came to the point at which it was just impossible to only use the theme.json so I finally had to abandon my goal and add a style.css file to the theme.
Some changes later, I’ve recognized that I had to use quite long repetitive CSS selectors and I got to the conclusion that I should use SASS as well.
After this sacrifice, things got a lot easier. Knowing who to write custom CSS code made styling the header so much easier. I was working on the header and the rest of the theme for the past four weeks, and the current state looks pretty close to the original theme.
The header
As mentioned above, the header was the reason to introduce a CSS file, but some of the styles were possible using the Site Editor only. In my first attempt, I even managed to get the Home Link icon in place, using the "css" property in the "core/home-link" block styles. Still, adjusting all the styles to match the original theme took me ~100 lines of CSS. But the result looks very good:
The original header
The new header
Can you spot the differences? You would probably need to use a tool to visualize them. The elements shift a few pixels, but overall it looks very similar. For the home icon, I had to create an SVG using the original (very small) PNG as a reference.
One difference you might have spotted is the usage of “down carets” after the nav items with a sub-navigation. This is an option you can disable using the “Display > Submenus > Show arrow” toggle in the Navigation block settings. But since I also want to improve the accessibility of the theme by default, I will keep this option enabled.
Creating additional templates
After I’ve finished the initial design, I continued with some templates. The first two I’ve created were “Single Posts” and “Pages”.
The posts template
I thought this would be quick. Just add the date and comments count (with an anchor link to the comments form) to the “entry header” and the categories, tags, and comments to the “entry footer”. I was so wrong. 🙈
When developing a new theme, I usually use the “Theme Unit Test” XML import file. This will create a lot of content and menus you can use to test your design. To test the different HTML tags and their styling in the new theme, I’ve used the “Template: Comments” blog post. This is when a large amount of custom CSS came into the theme. Elmastudio beutifully styles all the differently elements you can have in your content, like lists, quotes, tables, etc. And they also styled them (differently) for comments, to accommodate for the smaller width you would have in the comment content. This meant that I had to copy all these styles. And since you can only style very few native HTML elements using the theme.json I had to do this with more custom CSS code. I’ve ended up writing ~160 lines for those elements in the content and another ~100 lines for adjustments in the comment content. I now realize how much work and thought go into designing a theme with great styles, and I have even more respect for what Ellen and Manuel did with all their themes.
Introducing a new template part: comments
Since the theme is using the comments listing and comments form on posts and pages, I’ve created a new template part it. It contains the “Comment Template”, “Comments Pagination” and “Comments Form” blocks.
For the comments form, I also had to add ~75 lines of CSS (even using SASS) and it once again showed me, how frustrating it is to style form elements:
But hey, in the end it was “only” ~75 lines and I got to practice using CSS grid a bit more.
Post navigation buttons
Two other blocks I were not happy about in their current implementation were the “Previous post” and “Next post” blocks. They do offer an “Arrow” style variant, but this only adds an arrow before/after the link, which is not clickable. Since I wanted to have that “button design”, I had to use that “pseudo-content trick” to extend the clickable area of the link to the while “button”. Also, adding a background color for the button was not that easy, since the block wrapper div would also be visible if the link would not be there. So, in summary, these blocks could also receive some improvements in future versions of the Block Editor.
The pages template
After finalizing the Single Posts template, creating the Pages template was pretty straight forward. All I had to do was removing the date and comments link from the “entry header” and the categories and tags from the “entry footer”. The rest of the template is the same. Having introduced the “comments” template part before made it even easier, if I have to change some styles on that part.
The footer
After finishing the “entry content” part of posts and pages, I finished the footer. But since it’s mostly static content, that was done rather quickly. Only when saving the changes to the theme using the Create Block Theme plugin, I experienced some issues.
Static text would be wrapped in translation function, which is amazing! Only those are not escaped at all. And the year would also be hard coded. Even when you change that into dynamic code and escape it properly, it would get reverted back any time you make more changes to the footer part.
Escaped and dynamic footer
Here is some part of the footer code I have improved to be more secure and dynamic:
As you can see, the escaping is missing completely. And the last two paragraphs are not translatable anymore. I didn’t have the time to look at the code producing these lines, but there might be a solution for that. In the meantime, I have to revert these changes, any time I update the footer template part.
Conclusion
Creating a full theme is a lot of work! Even “just” re-implementing a Classic Theme as a Block Theme takes a lot of time, since there are so many details you must think about. And I even haven’t rigorously tested the theme on mobile – first test look good though.
There is still a lot of work to do, but I still hope that I can make the switch in two weeks. Even if the theme is not perfect at that time.
If you want to see all the other changes I made and didn’t mention in this update, or follow along with the further implementation, check out the commits on the GitHub repository. I am really happy with where the current implementation is at right now and can’t wait to finish the theme. 🙌
Readers of my German blog know this tradition of “blog birthday blog posts”. Another year has passed, and I’ve been blogging on this site for 15 years now. In that time, 401 posts have come together, but I only translated 188 into English, which I plan to change. So today is not the end of me blogging.
Closing More Plugins
A year ago, I announced that I had my first plugin closed. Since then, I’ve had four more removed from the Plugin Directory because either their functionality is now included into Core, or the technology behind them is no longer used. I’ll close another one when Preferred Languages finally lands in Core.
The numbers for the past year
Unfortunately, visits on the German site have also decreased by almost 18%, while on the English site, it was only 2% less. I can’t know exactly why this happened, but I hope that everyone who reads actively also finds the right content. If not, feel free to wish for a topic. Hopefully I don’t only get more readers, if I write something about AI. 😅
The number of visits on the English site continues to be higher than on the German one and increased from 53.4% to 57.8%. That’s why I’ve translated this blog post as well (I usually write English first, but only wrote the birthday blog posts in German).
It’s interesting to see, that hugely different blog posts made it into the Top3 compared to my German blog. As I haven’t really did a Top3 for past years, I can’t tell how they have changed. I might update this section, after I translated the previous birthday blog posts. A quick check on the statistics of last year shows the same three blog posts, only position 1 and 2 have changed.
Still no new theme
A year ago, I announced here that I wanted to work on a new theme. And as you could follow in previous posts, I’m making very good progress. I actually planned to use the new theme today for my blog’s birthday, but it’s not as good as I’d like it to be.
I’m writing this post from a hotel on the way back from WordCamp Europe 2024. That’s also why I couldn’t work on it as much. Just yesterday, I finally finished the footer on the train, and with the progress I made, all parts were newly created. But when exporting everything into the theme files, the footer suddenly broke. I was able to fix that today, but there are still many small details to be designed. Currently, I’m working on the comments section below the blog posts. But basic styles, like lists, tables, and similar content, also need to be adjusted. More on that in future posts.
And then I realized that my blog’s birthday isn’t the perfect day for the new theme, because 12 years ago, I was also looking for a new theme on the blog’s birthday and then activated it exactly a month later. So mark 12 July in your calendar.
Conclusion
So there’s still a lot going on, and I use many of my free minutes in my spare time to keep working on the blog. I hope the final theme also be something other people enjoy and use.
Oh yes, while I’m typing these lines, the soccer European Championship is on the TV in the hotel room. But those who know me, should also know that I don’t really into watching soccer. So there’s no video on that topic, but instead writing this from Switzerland, here’s the video with the announcement for the next WordCamp Europe, which I’ll definitely attend as well:
The header was always the part of the theme, I wasn’t sure I can easily replicate. But with every new Core or Gutenberg version, there have been more options to accomplish what I want to have as an end result. I still think that I need to add some custom CSS for some changes. But let’s take a look at how far I came.
The original header
Before I show you my first result, which I achieved just using the Site Editor and all available settings, let’s take a look at the original header again:
The actual “header” of the Waipoua theme is only row with the red background. The site title, site description and the “Header Widget Area” with the “Social Links Widget” are in the “wrapper” element for the content. But for the new theme, I decided to treat the whole area shown as the header.
The new header
So without further ado, let’s take a look at how far I came, rebuilding it with the Site Editor only. This is the first result:
You can already spot some clear differences. It starts with the “Home Link” block, the first element of the navigation, which does not support an icon. I will probably fix this with some custom CSS and a background image, and making the “Home” text “visually-hidden”.
The other clear difference is the search field. In the Waipoua header, this field has a transparent background. The icon is just a background image, and the search form does not have a “submit button”. When focused, the input grows a bit in width, and the background becomes white, while the icon and placeholder text become gray. This is a nice effect, and the “Search” block even supports something similar, but because it is right aligned, it would “jump to the left and grow to the right”. That was not really nice. It was also less accessible this way. That’s why I decided against it. I may still change the background color, as described before, but this is not possible with the block settings. Only the background and icon color of the button could be changed. I was also not able to reduce the height of the input field.
When it comes to the “second header row”, the site title looks different, since it’s underlined and not large enough. This is also something I couldn’t change in the Site Editor for some reason. The Core styles are just more specific and would therefore overwrite any settings made in the block settings.
The icons look pretty much the same. They are 1px smaller (the “normal” size in Core is just smaller), but the icons are also centered better than in the original theme, and they use the current icons (e.g. for YouTube or Instagram). Unfortunately, there is no icon for the “Comments RSS”. I don’t know how I would solve that on my blog. But is anyone using this RSS feed anyway? 🤔
The structure of the header
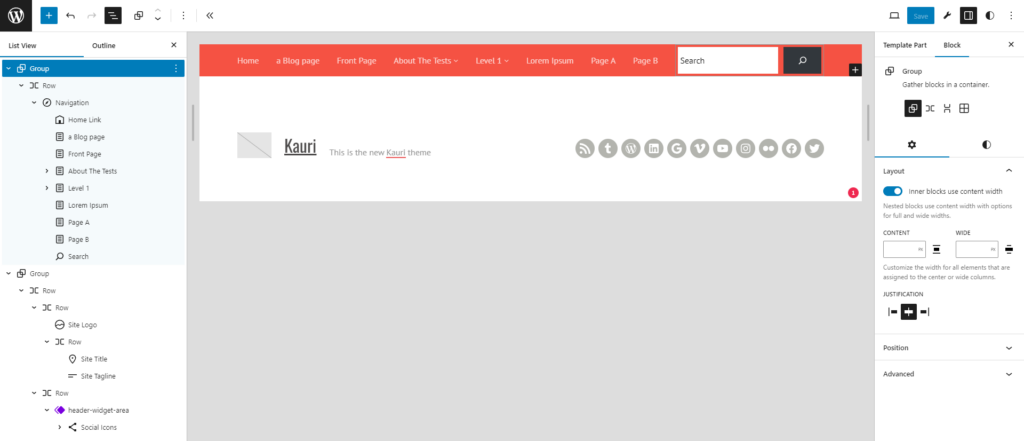
Now that we have seen the result in the frontend, let’s take a look at the structure in the Site Editor and which blocks I have used:
Most things are not surprising. But some details might be new to you. Did you know, for example, that you cannot only use links inside the navigation block, but also blocks like “Home Link”, “Search” or many other blocks? This is really nice, because when on a smaller screen, those block would also be in the “hamburger menu”.
The second “header row” is also quite basic in most parts. To align the site title and site description at the bottom – which I could find out how to do previously – I could simply use the “Change vertical alignment” setting.
The more interesting part is probably the social links. As mentioned earlier, this was the “Header Widget Area” in Waipoua, so I made this another template part, similar to how we did with the sidebar.
Conclusion: a lot of available settings
It’s hard to explain every step I took to implement the current header. It was just so many settings to use to come to this result. You can find the changes in the current commit to the Git repository for this theme. I was quite surprised that all settings were just saved into the template parts. I only added a new templateParts entry to the theme.json, so it would read “Header Widget Area” in the “List View” and not the slug, as in the screenshot.
My next step is trying to fix all those small differences in the header, I wasn’t able to do in the Site Editor alone. Let’s see how far I can come and how to explain, what I had to do, in the next blog post. As I just started my journey to WCEU, and have some more trains rides before me, the next blog post might come next week already.